Notionic博客定制化修改
type
Post
date
Feb 23, 2024
summary
自定义一些Notionic博客的参数,内容仅供参考~
category
实践技巧
tags
notionic
Blog
password
URL
Property
Apr 19, 2024 01:40 AM
博客的前期部署工作可以参考项目作者的文章:开源这个博客的源码 — Notionic
除了以下的修改,还有一些想修改但是还没成功的地方:
- 同步块内的文章无法显示目录
- 评论提交按钮在切换黑暗模式时有跳色
- 想一直固定底部导航栏没有成功
下面是一些符合我个人使用偏好的参数修改,仅供参考~
一、自定义内容区宽度
原内容区的宽度我个人觉得略窄了点,只有42rem。
先在网页上进行一次性修改看看效果,最终觉得 52rem 效果最佳,但是项目使用的是 tailwindcss,官方给出的默认最大宽度就没有 52rem(只有 42,48,56),经过研究项目发现有tailwindcss的配置文件,于是根据官方指引进行自定义样式添加并引用,步骤如下:
- 在
blog-notionic/tailwind.config.js文件中的 theme > extend中添加代码如下:
theme: {
    extend: {
      maxWidth: {
        'custom-3xl': '52rem',
      },
      colors: {……
- 在
blog-notionic/components/Container.js文件中将十六行的max-w-3xl修改为max-w-custom-3xl即可
二、页脚中的内容修改
2.1、删减和更改社交图标
不显示 telegram 和 Twitter 图标,新增 contact 图标并隐藏 contact 页面按钮
- 删除:在
components/Common/Social.js文件中注释(删除)掉 telegram 和 Twitter 图标相关的代码
- 新增:在 这里 找一个mail对应的图标(我选择的是 envelope),然后复制 svg。字啊代码中复制一份社交代码,替换掉里面的 svg 部分,再修改 Link 组件的
href='/contact’即可。
- 隐藏 contact 页面按钮:在
blog.config.js文件中,将pagesShow对象的 contact 值设置为 false 即可。
完整代码如下:
	 	 	<Link
        // href={`${BLOG.socialLink.telegram}`}
        passHref
        href='/contact'
        scroll={false}
        target='_blank'
        aria-label='Mail'
        className='text-gray-400 hover:text-gray-500 active:text-gray-600 transition duration-100'
      >

        <svg
          xmlns="http://www.w3.org/2000/svg"
          fill="none"
          viewBox="0 0 24 24"
          stroke-width="1.5"
          stroke="currentColor"
          class="w-6 h-6"
        >
          <path stroke-linecap="round" stroke-linejoin="round" d="M21.75 6.75v10.5a2.25 2.25 0 0 1-2.25 2.25h-15a2.25 2.25 0 0 1-2.25-2.25V6.75m19.5 0A2.25 2.25 0 0 0 19.5 4.5h-15a2.25 2.25 0 0 0-2.25 2.25m19.5 0v.243a2.25 2.25 0 0 1-1.07 1.916l-7.5 4.615a2.25 2.25 0 0 1-2.36 0L3.32 8.91a2.25 2.25 0 0 1-1.07-1.916V6.75" />
        </svg>

      </Link>
2.2、在页脚中新增页面
以新增一个音乐播放器页面为例,步骤如下:
- 先在 notion 模板中新建一行,类型为页面,设置 slug
- 在 这里 找一个页面对应的图标。比如我想新增的页面是营业播放器页面,那么就搜索 play,选择其中一个进行下一步

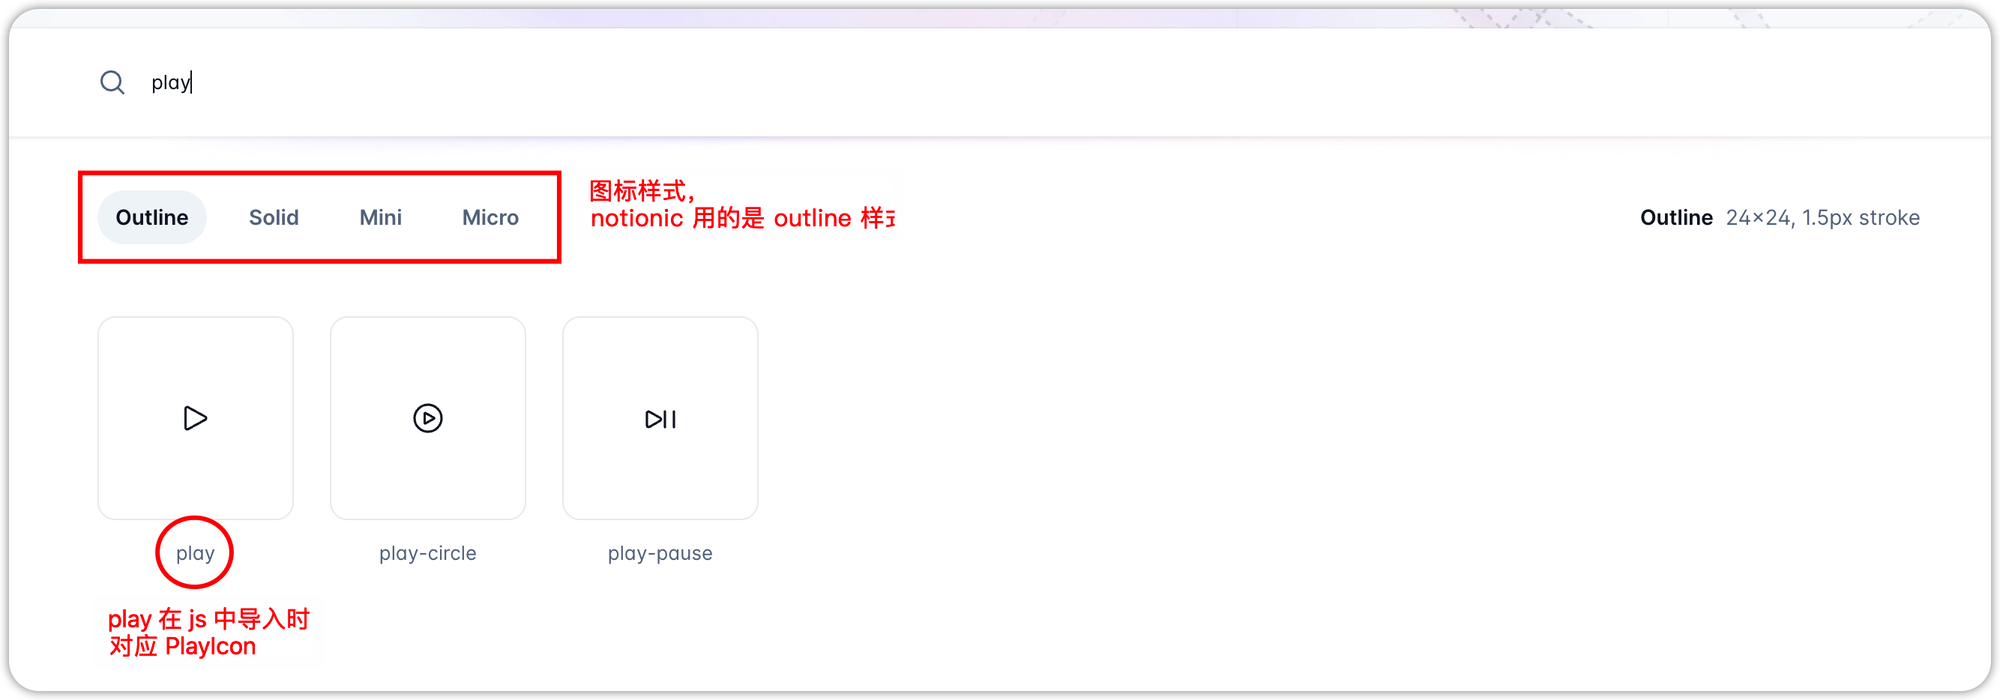
不知道为啥,如果选择多个单词的图标(导入时遵循驼峰命名的规则)则会部署报错
- 在
lib/lang.js文件的NAV对象中增加代码(中英文都需要增加)
  zh: {
    NAV: {
			……
      MUSIC: '听歌'
    },
	}
……
  en: {
    NAV: {
			……
      MUSIC: 'Music'
    },
	}
- 在
blog.config.js文件的pagesShow对象中增加代码:
  pagesShow: {
		……
    music: true,
  },
- 在
components/NavBar/Footer.js文件中 - 先导入图标组件(直接在源代码的后面添加PlayIcon就行了)
- 在 links 列表中新增一个类似的元素(元素是 python 中的叫法,暂且这么叫吧),元素是一个对象。比如我要新增一个听歌页面,则对象中的键值对分别是:
import {
  UserIcon,
  UsersIcon,
  BookOpenIcon,
  MailIcon,
  PlayIcon
} from '@heroicons/react/outline'
    {
      id: 3,   // 决定展示的顺序,自行设定,尽量不与已有的 id 重复
      name: t.NAV.MUSIC,   // 这个值需要在文件 lib/lang.js 中修改,后面会提到
      to: '/music',   // 新页面的路由地址,也就是 notion 中新建页面的 slug(此处前面会有个反斜杠)
      icon: <PlayIcon className='inline-block mb-1 h-5 w-5' />,  // 图标组件,只需要更换前面的,className 那一串不动
      show: BLOG.pagesShow.music  // 是否展示,这个值可以直接填布尔值,也可以在 blog.config.js 文件中设置,后面会提到
    },
三、友链的gallery预览图标调整
原gallery预览图标只能显示一半,通过盒子模型能看到position 的值是-11,正是由此导致了预览图标的偏移。在盒子模型上将 position 调整为 0,能看到对应的img标签的 style 属性被增加了一个值
top:0; 。根据这个变化,我们可以在源代码中定位当前预览图标的类名来添加这个值即可。具体操作步骤如下:在
/styles/notion.css 文件中添加代码/* 修复预览图标只显示一半 */ .lazy-image-real { top: 0; }
四、多级主题合并问题修复
一级标题后面如果紧跟二级、三级标题,则二三级标题会和一级标题显示在同一行;二级标题后如果紧跟三级标题,会出现同样的问题;
解决思路是将标题块标签设置为块标签,让标题标签独占一行即可。
在
/styles/notion.css 文件中添加代码/* 修复标题不换行 */ .notion-h, .notion-h1, .notion-h2, .notion-h3 { display: block; }
五、表格被撑大修复
单元格内的文本不会横向延伸,而选择了纵向换行。
在
/styles/notion.css 文件中添加代码如下:.notion-simple-table { @apply whitespace-nowrap overflow-x-auto block w-full border-0 !important; /* 设置表格超出后显示滑动条 */ line-height: 1.5rem; /* 设置表格内行高(默认是用 notion 的行高 2) */ } .notion-simple-table td { border: 1px solid darkgray; /* 设置表格边框颜色 */ white-space: pre; /* 设置单元格内文本不自动换行而导致表格被撑大 */ }
六、搜索页面逻辑修改
原有逻辑:标签一直显示在搜索页面顶部(当标签很多时,搜索结果会很靠下)
<Tags tags={tags} currentTag={currentTag} />
目标逻辑:
- 在初始进入搜索页面时,显示所有标签;
- 当进行搜索并且有搜索结果时,只显示对应的文章,不显示标签;
- 在搜索结束后删除搜索框中的内容时,重新显示所有标签;
- 如果搜索没有结果,则显示所有标签,并将 NOT_FOUND 显示在标签的上方;
- 当手动选择一个标签后,只显示标签对应的文章,不显示标签;
要实现以上逻辑,需要通过新增一个状态变量来控制 Tags 组件的渲染(如果直接用条件判断,则在初次进入搜索页面时也不会显示标签了)。在
layouts/search.js 文件中:主要新增代码如下:
import { useState, useEffect } from 'react’

……

  // 新增状态变量 showTags,用于控制是否显示标签
  const [showTags, setShowTags] = useState(true)

  // 在搜索结果发生变化时,更新 showTags 状态
  useEffect(() => {
    // 只有当搜索框中有输入时,才更新 showTags 状态
    if (searchValue !== '') {
      if (filteredBlogPosts.length > 0) {
        setShowTags(false)
      } else {
        setShowTags(true)
      }
    } else {
      // 当搜索框为空时,根据 currentTag 的值来更新 showTags 状态
      if (currentTag) {
        setShowTags(false)
      } else {
        setShowTags(true)
      }
    }
  }, [filteredBlogPosts, searchValue, currentTag])

……

      {/* 修改只有当没有搜索到结果时才显示标签,搜索到结果则不显示标签 */}
      {showTags && <Tags tags={tags} currentTag={currentTag} />}
完整代码如下:
import { useState, useEffect } from 'react'
import BlogPost from '@/components/BlogPost'
import Container from '@/components/Container'
import Tags from '@/components/Common/Tags'
import PropTypes from 'prop-types'
import { lang } from '@/lib/lang'
import { useRouter } from 'next/router'

const SearchLayout = ({ tags, posts, currentTag }) => {
  const [searchValue, setSearchValue] = useState('')
  const { locale } = useRouter()
  const t = lang[locale]

  let filteredBlogPosts = []
  if (posts) {
    filteredBlogPosts = posts.filter((post) => {
      const tagContent = post.tags ? post.tags.join(' ') : ''
      const searchContent = post.title + post.summary + tagContent
      return searchContent.toLowerCase().includes(searchValue.toLowerCase())
    })
  }

  // 新增状态变量 showTags,用于控制是否显示标签
  const [showTags, setShowTags] = useState(true)

  // 在搜索结果发生变化时,更新 showTags 状态
  useEffect(() => {
    // 只有当搜索框中有输入时,才更新 showTags 状态
    if (searchValue !== '') {
      if (filteredBlogPosts.length > 0) {
        setShowTags(false)
      } else {
        setShowTags(true)
      }
    } else {
      // 当搜索框为空时,根据 currentTag 的值来更新 showTags 状态
      if (currentTag) {
        setShowTags(false)
      } else {
        setShowTags(true)
      }
    }
  }, [filteredBlogPosts, searchValue, currentTag])

  return (
    <Container>
      <div className='relative'>
        <input
          type='text'
          placeholder={
            currentTag
              ? `${t.SEARCH.ONLY_SEARCH} #${currentTag}`
              : `${t.SEARCH.PLACEHOLDER}`
          }
          className='w-full bg-white dark:bg-gray-600 shadow-md rounded-lg outline-none focus:shadow p-3'
          onChange={(e) => setSearchValue(e.target.value)}
        />
        <svg
          className='absolute right-3 top-3 h-5 w-5 text-gray-400'
          xmlns='http://www.w3.org/2000/svg'
          fill='none'
          viewBox='0 0 24 24'
          stroke='currentColor'
        >
          <path
            strokeLinecap='round'
            strokeLinejoin='round'
            strokeWidth='2'
            d='M21 21l-6-6m2-5a7 7 0 11-14 0 7 7 0 0114 0z'
          ></path>
        </svg>
      </div>
      <div className='article-container my-8'>
        {!filteredBlogPosts.length && (
          <p className='text-gray-500 dark:text-gray-300'>
            {t.SEARCH.NOT_FOUND}
          </p>
        )}
	      {/* 只有当 showTags 为 true 时才渲染 Tags 组件;顺便调整了组件的位置,让NOT_FOUND显示在标签上方 */}
	      {showTags && <Tags tags={tags} currentTag={currentTag} />}
        {filteredBlogPosts.slice(0, 20).map((post) => (
          <BlogPost key={post.id} post={post} />
        ))}
      </div>
    </Container>
  )
}
SearchLayout.propTypes = {
  posts: PropTypes.array.isRequired,
  tags: PropTypes.object.isRequired,
  currentTag: PropTypes.string
}
export default SearchLayout
七、文章目录缩进逻辑修改
文章所有级别的目录都是靠左对齐的,没有缩进。修改步骤如下:
在
components/Post/TableOfContents.js 文件中将 51 行 div 标签的className替换如下:className={`px-2 hover:bg-gray-200 hover:dark:bg-gray-700 rounded-lg border-b border-gray-200 dark:border-gray-700 ${node.indentLevel === 0 ? '' : node.indentLevel === 1 ? 'ml-4' : 'ml-8'}`}
八、一些其他样式定制修改
在
/styles/notion.css 文件中添加代码如下:/* 定制化样式 */ /* 友链头像设置圆角,设置图片高度(修复长方形图片设置圆角会变成椭圆的问题) */ .notion-collection-card-property .notion-page-title-icon { border-radius: 50%; /* 设置圆角半径为图片的短边的一半 */ height: 22px; } /* 友链卡片的友链名称 */ .notion-page-title-text { font-size: 16px; } /* 友链卡片中的描述文本行高 */ .notion-property-text { line-height: 2rem; } /* 友链链接设置 */ input.nested-form-link.notion-link { color: #5979EE; text-decoration: none; /* 取消下划线 */ } /* 友链卡片整体设置 */ a.notion-collection-card.notion-collection-card-size-small { background-color: rgba(255, 255, 255, 0.3); /* 设置友链卡片透明度 */ border-radius: 20px; /* 友链卡片的圆角设置 */ } /* 评论框调整 */ /* 评论内容 */ textarea#comment { height: 120px; border-radius: 20px; background-color: hsla(0,0%,100%,0); box-shadow: 0 0 0 1px hsla(0,0%,6%,.1), 0 2px 4px hsla(0,0%,6%,.1); } /* 评论邮箱 */ input#mail { padding-top: 4px; padding-bottom: 4px; height: 38px; border-radius: 10px; background-color: hsla(0,0%,100%,0); box-shadow: 0 0 0 1px hsla(0,0%,6%,.1), 0 2px 4px hsla(0,0%,6%,.1); } /* 评论名称 */ input#name { padding-top: 4px; padding-bottom: 4px; height: 38px; border-radius: 10px; background-color: hsla(0,0%,100%,0); box-shadow: 0 0 0 1px hsla(0,0%,6%,.1), 0 2px 4px hsla(0,0%,6%,.1); } /* 评论提交按钮 */ button.inline-block.bg-gray-100.dark\:bg-gray-700.hover\:bg-gray-200.dark\:hover\:bg-gray-600.text-center.rounded-lg.outline-none.transition.duration-100.px-8.py-3 { background-color: #e5e7ebad; padding-left: 16px; padding-right: 16px; padding-top: 12px; padding-bottom: 12px; height: 48px; } p.text-gray-400.h-5 { color: #4d5562ea; /* 按钮文字 */ } /* 联系页面文本框 */ textarea#message { height: 250px; border-radius: 20px; background-color: hsla(0,0%,100%,0); box-shadow: 0 0 0 1px hsla(0,0%,6%,.1), 0 2px 4px hsla(0,0%,6%,.1); } /* 代码块相关 */ code[class*=language-], div[class*=language-], pre[class*=language-] { color: #E4EAF1 !important; /* 非关键字代码颜色 */ } pre.notion-code { /* background-color: #4D5562 !important; background-color: #2f425fd3 !important; background-color: #020b19d0 !important; */ background-color: #09111E !important; /* 代码块颜色 */ border-radius: 15px; /* 代码块圆角 */ } .notion-inline-code { /* 行内代码块 */ color: #4D5562; background-color: #E4EAF1; } /* 引用块设置 */ .notion-callout { border-radius: 20px; /* 圆角 */ background-color: #D7E3F4; /* 背景色 */ }