Mac本地RAG文档问答——Llama2 & ChatGLM3(量化版) & Ollama
type
Post
date
Mar 26, 2024
summary
过去文档检索的基本技术框架,中间每一步都有相当的技术复杂度,过去只有大厂在有巨大需求的场景去实现这样的能力。但是LLM的出现,让文档检索这件事情的门槛骤然降低,用向量数据库就可以轻松构建自己的文档检索系统,结合LLM的对话生成能力,真正实现文档问答的能力。
category
学习笔记
tags
LLMs
大语言模型
RAG
检索增强生成
LLM
文档问答
Llama
ChatGLM
password
URL
Property
Jun 20, 2025 01:53 AM
关于量化
深度神经网络模型在结构设计好之后,训练过程核心目的是确定每个神经元的权重参数,精度有 16、32、64 位不一,基于GPU加速训练所得,量化就是通过将这些权重的精度降低,以降低硬件要求的过程。
举例而言,LLaMA 模型为 16 位浮点精度,其 7B 版本有 70 亿参数,该模型完整大小为 13 GB,则用户至少须有如此多的内存和磁盘,模型才能可用,更不用提 13B 版本 24 GB 的大小,令人望而却步。但通过量化,比如将精度降至 4 位,则 7B 和 13B 版本分别压至约 4 GB 和 8 GB,消费级硬件即可满足要求,大家便能在个人电脑上体验大模型了。
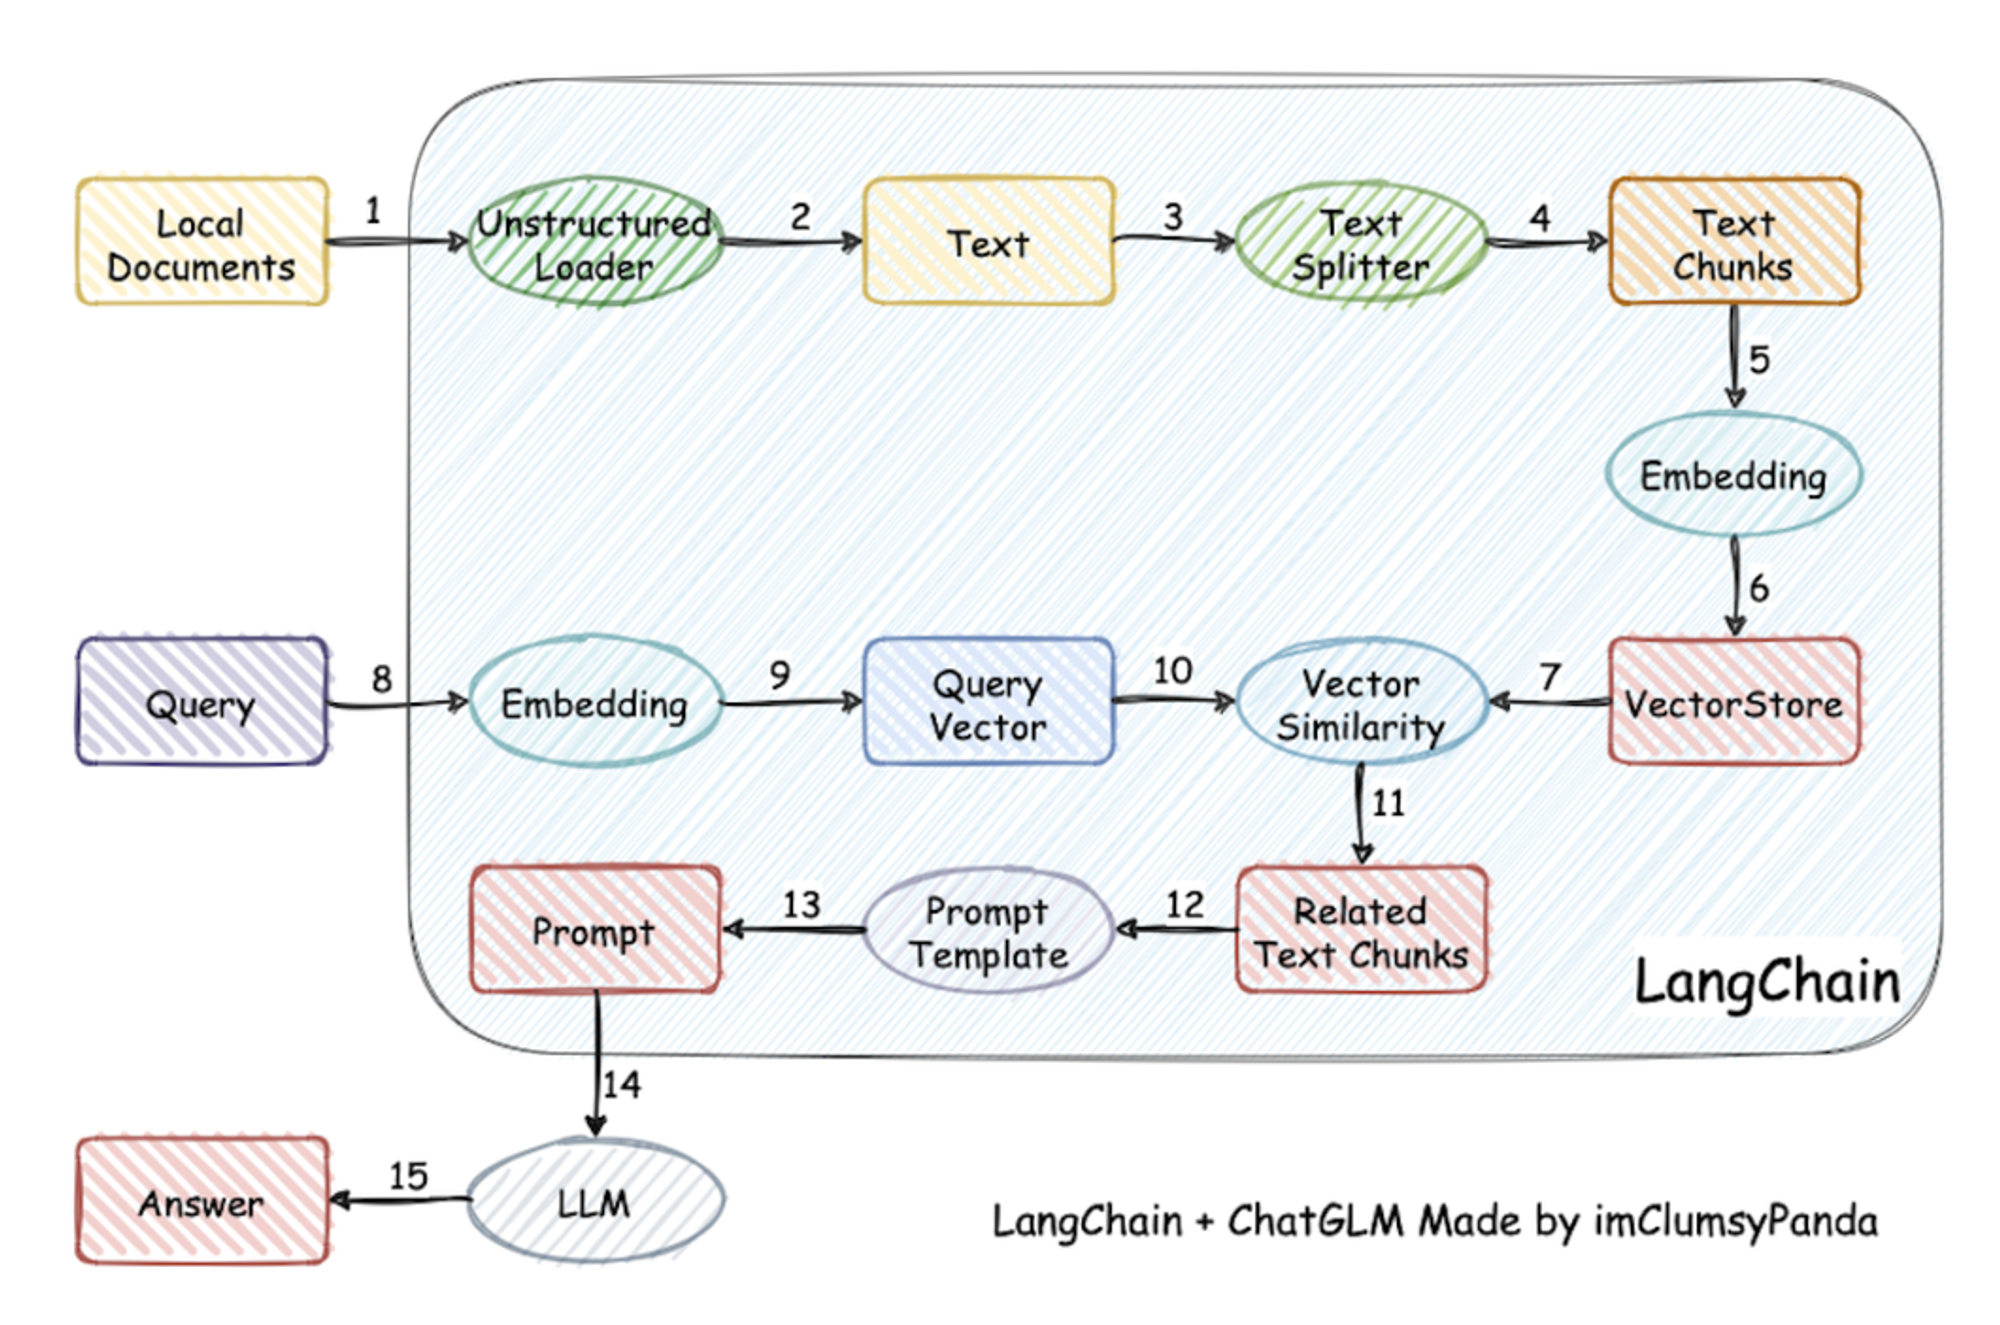
一、文档问答流程
- 加载文档:文档类型可以是网页、PDF、Markdown
- 文本切割:将文本分解成一个个块(chunks)
- 文本嵌入(embeddings):就是将一段文本,转化成一个能够表征文本语义的向量,语义上相近的文本他们的向量也相似。
- 向量存储:将embedding后得到的向量存入向量数据库中,相当于建立了索引
- 查询过程:在向量数据库中寻找并返回与这个查询最相似的n个查询
- LLM处理:将这n个结果输入LLM进行处理,获得最后的答案。


二、Llama2-cpp + 文档问答
Llama-2-13B-chat-GGUF + LangChain + llama-cpp-python
Llama.cpp 介绍
LLaMA.cpp 项目是开发者 Georgi Gerganov 基于 Meta 释出的 LLaMA 模型(简易 Python 代码示例)手撸的纯 C/C++ 版本,用于模型推理。所谓推理,即是给输入-跑模型-得输出的模型运行过程。那么,纯 C/C++ 版本有何优势呢?
- 无需任何额外依赖,相比 Python 代码对 PyTorch 等库的要求,C/C++ 直接编译出可执行文件,跳过不同硬件的繁杂准备;
- 支持 Apple Silicon 芯片的 ARM NEON 加速,x86 平台则以 AVX2 替代;
- 具有 F16 和 F32 的混合精度;
- 支持 4-bit 量化;
- 无需 GPU,可只用 CPU 运行;
2.1、下载和启动 Llama-2 模型(cpp 版)
2.1.1、下载Llama-2模型
网络不稳定,也可以选择手动下载
- 模型地址
TheBloke/Llama-2-13B-chat-GGML(LLAMA.cpp不再支持GGML模型,使用GGUF文件格式)- TheBloke/Llama-2-13B-chat-GGUF
# 命令行安装和导入使用,有时网络不稳定

# 在命令行里先进入 Python 环境

# 下载单个文件
from huggingface_hub import hf_hub_download
hf_hub_download(repo_id="lysandre/arxiv-nlp", filename="config.json")
hf_hub_download(repo_id="lysandre/arxiv-nlp", filename="config.json", revision="v1.0")
hf_hub_download(repo_id="lysandre/arxiv-nlp", filename="config.json", revision="test-branch")
hf_hub_download(repo_id="lysandre/arxiv-nlp", filename="config.json", revision="refs/pr/3")
hf_hub_download(repo_id="lysandre/arxiv-nlp", filename="config.json", revision="877b84a8f93f2d619faa2a6e514a32beef88ab0a")

# 下载整个仓库
from huggingface_hub import snapshot_download
# 路径需要自己创建目标文件夹,该下载程序只会下载文件,不会创建文件夹
local_dir = "/Users/ayd/Desktop/Project_practice/LongChain/Tongyi-Qwen/Qwen-7B-Chat-Int4"
snapshot_download(repo_id="Qwen/Qwen-7B-Chat-Int4", ignore_patterns="*.safetensors", local_dir=local_dir)   # 忽略某些后缀文件,多个用列表
snapshot_download(repo_id="GanymedeNil/text2vec-large-chinese", ignore_patterns=["*.safetensors","*.bin"], local_dir=local_dir)
snapshot_download(repo_id="Qwen/Qwen-7B-Chat-Int4", allow_patterns="*.safetensors", local_dir=local_dir)    # 指定下载某些后缀文件,多个用列表
2.1.2、llama-cpp-python 安装和启动
用llama-cpp-python来启动Llama-2模型
- GitHub 官方地址:llama-cpp-pythonabetlen • Updated Jul 17, 2025
- 指定虚拟环境安装(llama-cpp-python),据说如果和 langchain(langchain env) 装在一个环境中会有冲突
- 为了启用对于Metal (Apple的GPU加速框架) 的支持,使用以下命令安装llama-cpp-python:
安装命令自带Web server服务,如果提示没有责可以单独安装
pip install llama-cpp-python[server] 不过直接用这个命令会报错,可以尝试pip install `llama-cpp-python[server]`# 先进入虚拟环境 conda activate llama-cpp-python # 只需要安装一次,之后启动不需要重复安装 CMAKE_ARGS="-DLLAMA_METAL=on" FORCE_CMAKE=1 pip install llama-cpp-python
- 启动llama-cpp-python web server (带Metal GPU加速);
# 先进入虚拟环境
conda activate llama-cpp-python

# 启动 llama-cpp
python -m llama_cpp.server --model /Users/ayd/Desktop/Project_practice/LongChain/llama-cpp-python/models/Llama-2-13B-chat-GGUF/llama-2-13b-chat.Q2_K.gguf --n_gpu_layers 1
启动过程中安装了很多依赖包(为了能实现OpenAI 格式的 API)
pip install uvicorn
pip install anyio
pip install starlette
pip install fastapi
pip install sse_starlette
pip install starlette_context
pip install pydantic_settings
2.1.3、成功进入界面:http://localhost:8000/docs

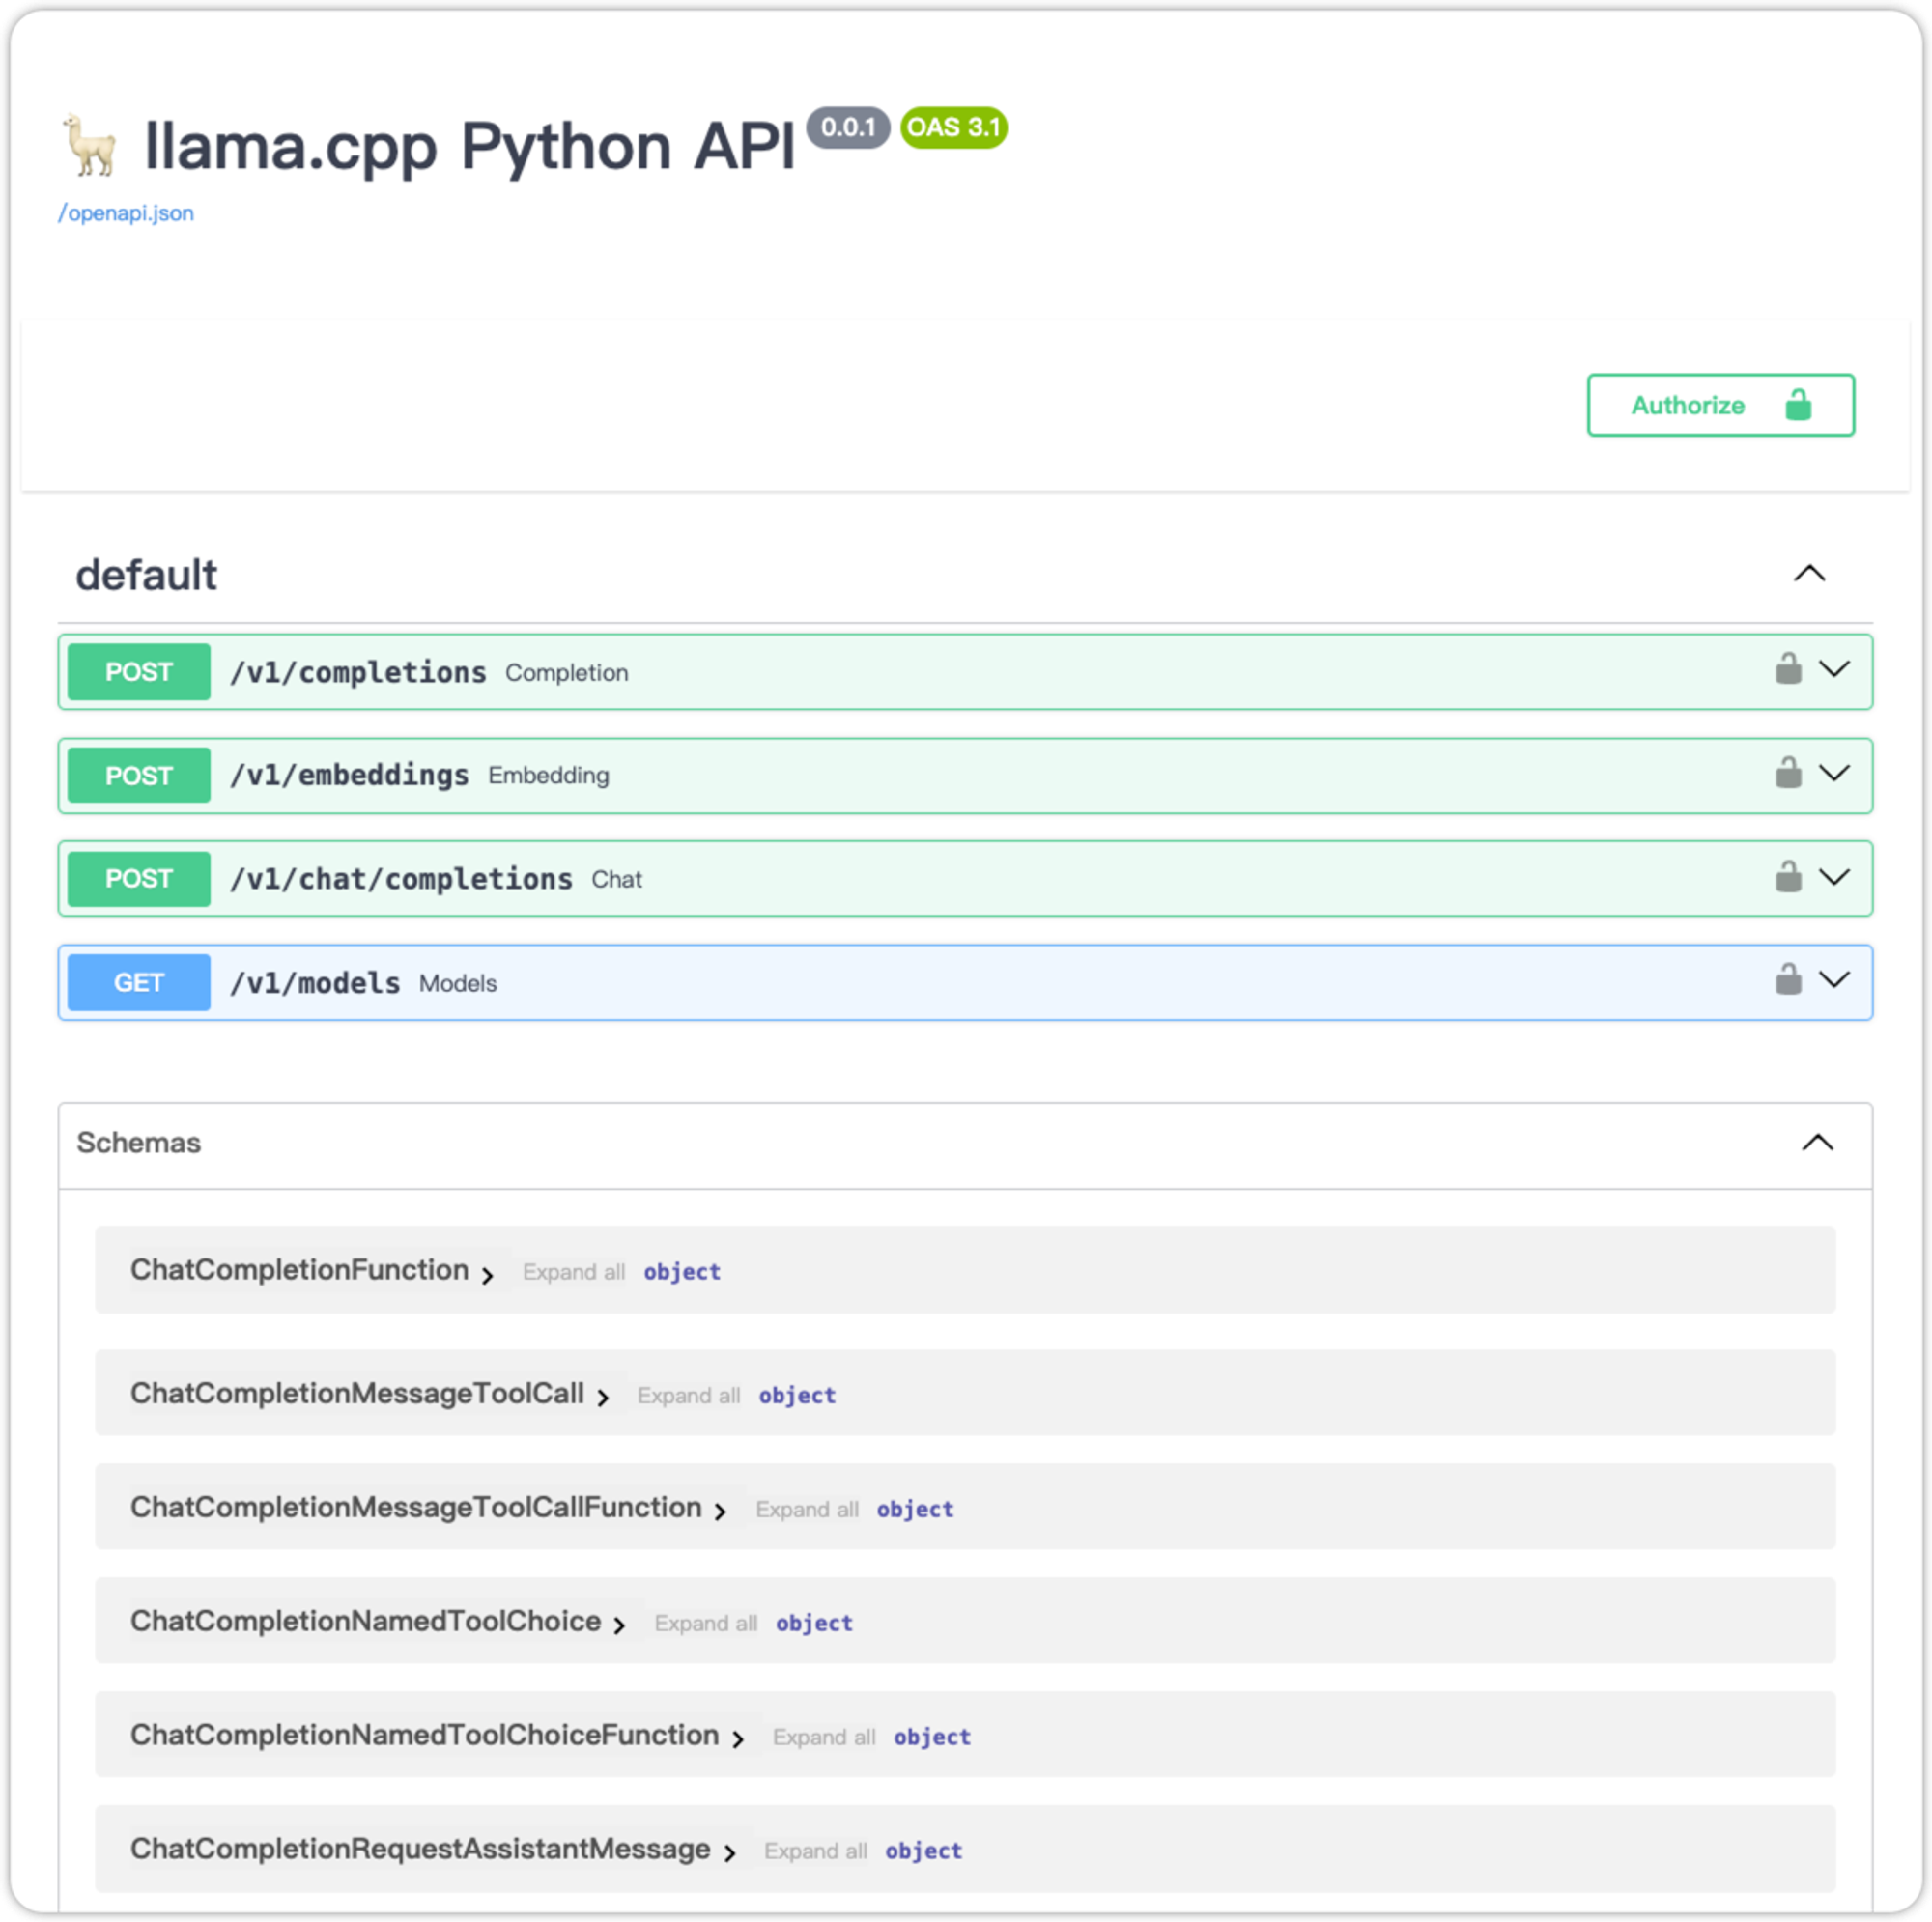
content: 消息的文本内容 (String)
role: 对话中发出该消息的角色,可取system,user,assistant之一。其中system为高级别的指示,用于指导模型的行为,例如上图的示例中告诉模型: "You are a helpful assistant."。user表示用户发送的消息,assistant表示模型的回答。
2.2、LangChain 搭建 LLM应用
2.2.1、应用概述
- 构建一个用于回答针对特定文档内容提问的聊天机器人
- 可行的思路:
- 常规in-context-learning:将文档作为Prompt提供给模型,从而模型能够根据所提供的Context进行回答
- 文档的长度超出了模型的Context长度限制,原版Llama2的Context长度为4096个Tokens。
- 对于较长的Context,模型可能会Lost in the Middle,无法准确从Context中获取关键信息。
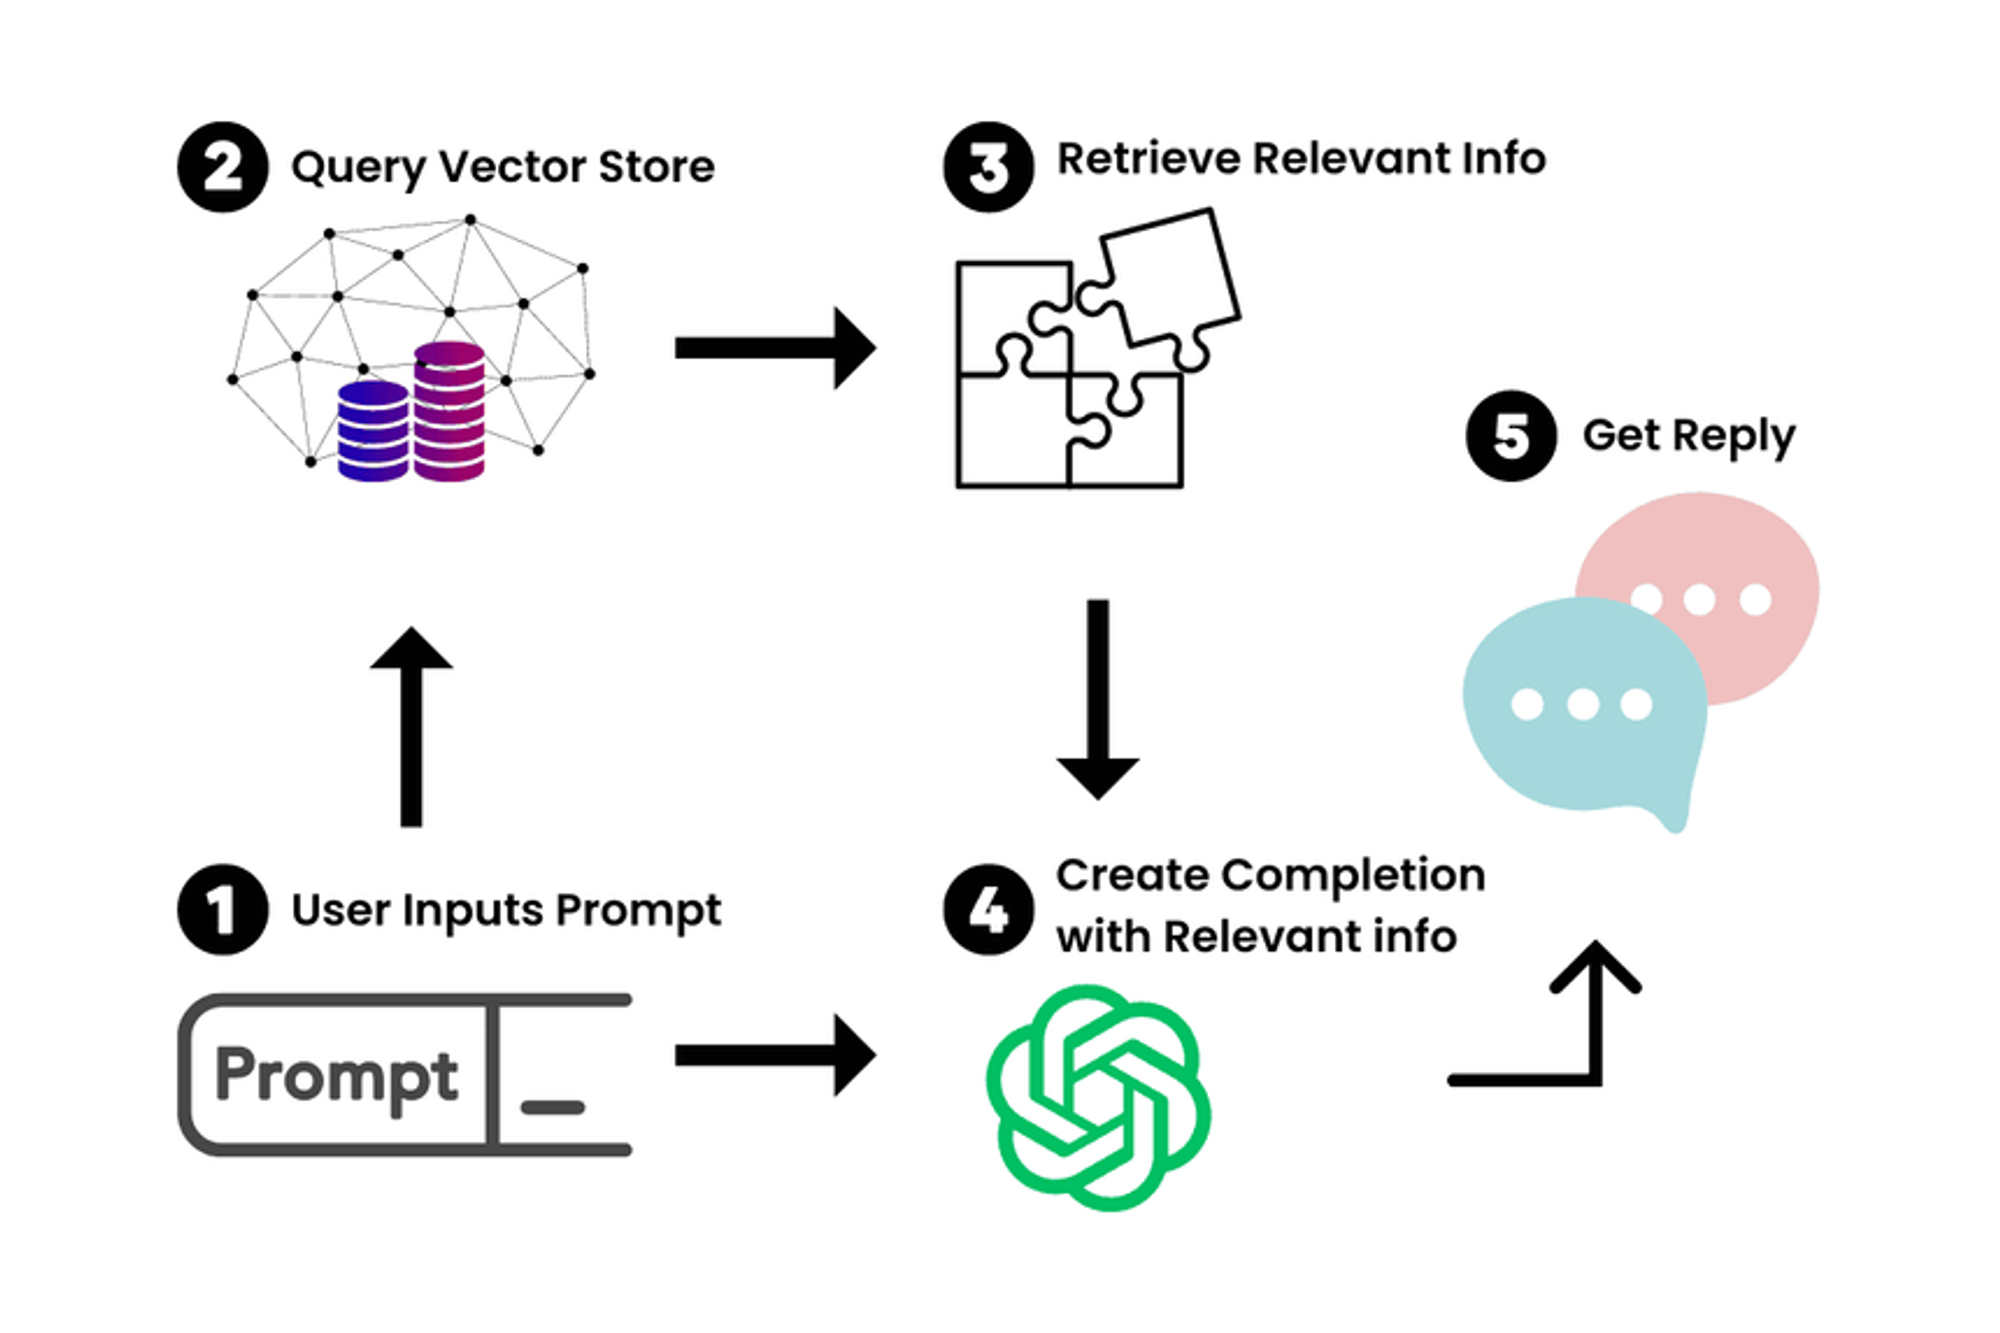
- 取巧in-context-learning:在构建Prompt时,只输入与用户的问题最相关的文档内容。
- 文档处理与存储:将原始文本进行分块 (Splitting),并使用语言模型对每块文本进行embedding,得到文本的向量表示,最后将文本向量存储在支持相似性搜索的向量数据库中。
- 用户询问和Prompt构建:根据用户输入的询问,使用相似性搜索在向量数据库中提取出与询问最相关的一些文档分块,并将用户询问+文档一起构建Prompt,随后输入LLM并得到回答。
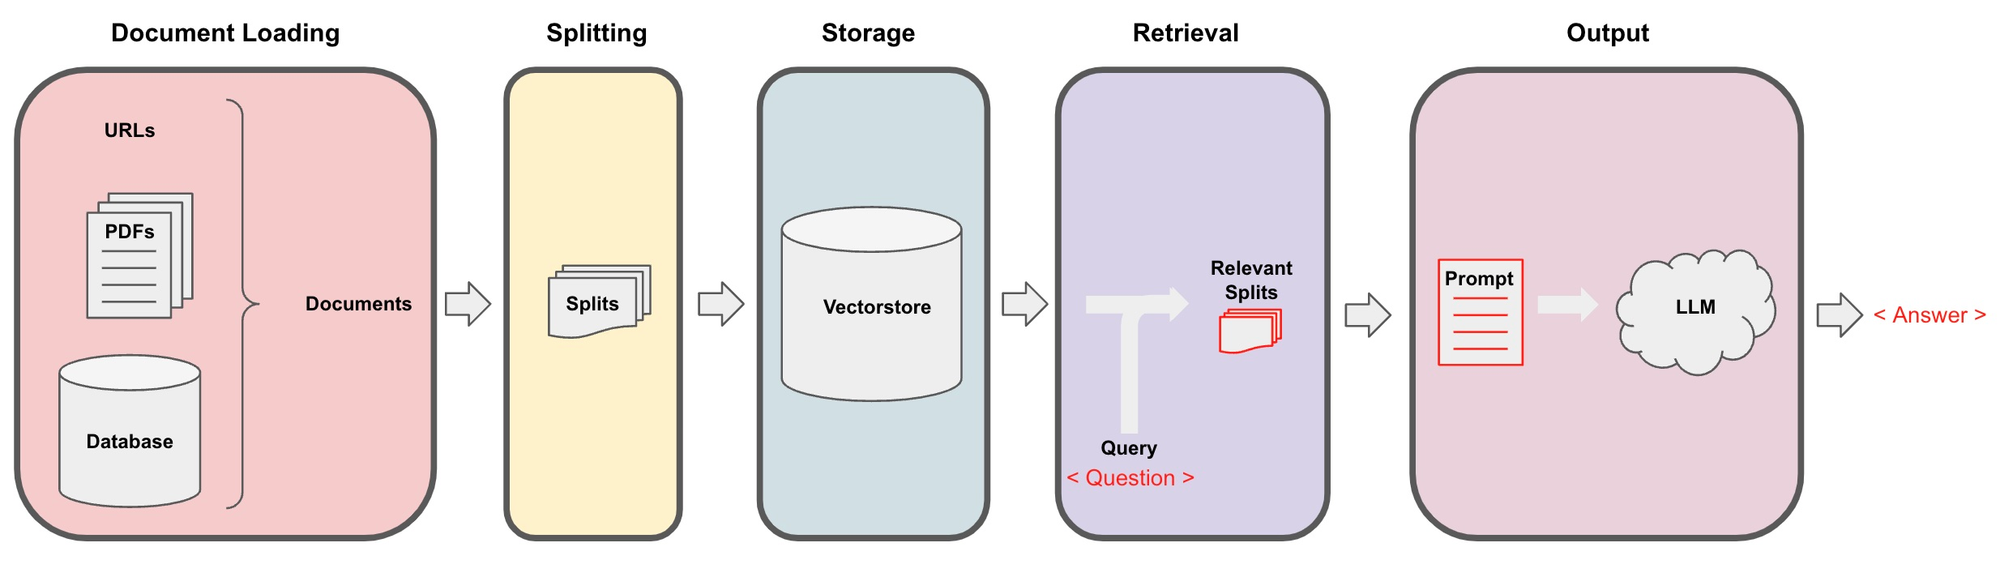
构建文档Q&A应用的常用架构:

2.2.2、构建步骤
- 调用本地模型(保持本地模型在运行)
from langchain.chat_models import ChatOpenAI
from langchain.schema import AIMessage, HumanMessage, SystemMessage

chat_model = ChatOpenAI(openai_api_key = "EMPTY", openai_api_base = "http://localhost:8000/v1", max_tokens=256
# openai_pi_base为模型API的Base URL;将调用/v1/chat/completions API
# max_tokens限制了模型回答的长度

system_text = "You are a helpful assistant."
human_text1 = "What is the capital of France?"
assistant_text = "Paris."
human_text2 = "How about England?"

# 设置上下文信息
messages = [SystemMessage(content=system_text),
            HumanMessage(content=human_text1),
            AIMessage(content=assistant_text),
            HumanMessage(content=human_text2)]

# 预测
chat_model.predict_messages(messages)
- Document Loading
from langchain.document_loaders import UnstructuredMarkdownLoader    # 文档加载

loader = UnstructuredMarkdownLoader("./llama-cpp-python/models/Llama-2-13B-chat-GGUF/README.md")
text = loader.load()
text
- Text Splitting
from langchain.text_splitter import RecursiveCharacterTextSplitter    # 文本切割

text_splitter = RecursiveCharacterTextSplitter(
    chunk_size = 2000,           # 文本进行Split后每个分块的最大长度,所有分块将在这个限制以内
    chunk_overlap  = 400,        # 前后分块overlap的长度,overlap是为了保持前后两个分块之间的语义连续性
    length_function = len,       # 度量文本长度的方法
    is_separator_regex = False   # 是否使用正则分隔符
)

all_splits = text_splitter.split_documents(text)
all_splits[:5]
- Text Embeddings + Vector Storage
import requests
from langchain.embeddings.base import Embeddings

class LocalLlamaEmbeddings(Embeddings):
    def embed_documents(self, texts):
        url = "http://localhost:8000/v1/embeddings"
        request_body = {
            "input": texts
        }
        response = requests.post(url, json=request_body)
        return [data["embedding"] for data in response.json()["data"]]

    def embed_query(self, text):
        url = "http://localhost:8000/v1/embeddings"
        request_body = {
            "input": text
        }
        response = requests.post(url, json=request_body)
        return response.json()["data"][0]["embedding"]
from langchain.vectorstores import FAISS

# 构造向量数据库
vectorstore = FAISS.from_documents(documents=all_splits, embedding=LocalLlamaEmbeddings())

question = "How to run the program in interactive mode?"
docs = vectorstore.similarity_search(question, k=1)    # 相似性查询
docs
- Text Retrieval & Query LLM
from langchain.llms import OpenAI
from langchain.chat_models import ChatOpenAI
from langchain.chains import RetrievalQA

chat_model = ChatOpenAI(openai_api_key = "EMPTY", openai_api_base = "http://localhost:8000/v1", max_tokens=256)

qa_chain = RetrievalQA.from_chain_type(chat_model, retriever=vectorstore.as_retriever(search_kwargs={"k": 1}))
"""
构造RetrievalQA需要提供一个LLM的实例,我们提供基于本地部署的Llama2构造的ChatOpenAI;还需要提供一个文本的Retriever,我们提供FAISS向量数据库作为一个Retriever,参数search_kwargs={"k":1}设置了Retriever提取的文档分块的数量,决定了最终Prompt包含的文档内容的数量,在这里我们设置为1。 向Chain中传入询问,即可得到LLM根据Retriever提取的文档做出的回答。
"""

qa_chain({"query": "How to run the program in interactive mode?"})
# RetrievalQA生成的默认Prompt
qa_chain.combine_documents_chain.llm_chain.prompt.messages[0].prompt.template
# 自定义prompt模板

from langchain.chains import RetrievalQA
from langchain.prompts import PromptTemplate

template = """Use the following pieces of context to answer the question at the end.
If you don't know the answer, just say that you don't know, don't try to make up an answer.
Use three sentences maximum and keep the answer as concise as possible.
Always say "thanks for asking!" at the end of the answer.
{context}
Question: {question}
Helpful Answer:"""
QA_CHAIN_PROMPT = PromptTemplate.from_template(template)

qa_chain = RetrievalQA.from_chain_type(
    chat_model,
    retriever=vectorstore.as_retriever(search_kwargs={"k": 1}),
    chain_type_kwargs={"prompt": QA_CHAIN_PROMPT}
)
qa_chain({"query": "What is --interactive option used for?"})
构建过程中安装的包
pip install openai
pip install unstructured
pip install markdown
三、ChatGLM3-cpp + 文档问答
ChatGLM模型没有现成的量化模型文件,而是需要我们先下载正常的模型文件,然后通过转换编译来生成量化模型文件。
3.1、下载模型文件并编译成 cpp 版本
- (这个项目可以实现转换和编译)chatglm.cppli-plus • Updated Jul 16, 2025
chatglm2-6b下载
from huggingface_hub import snapshot_download
local_dir = "/Users/ayd/Desktop/Project_practice/LongChain/chatglm3-6b-cpp/models/chatglm3-6b"
snapshot_download(repo_id="THUDM/chatglm3-6b", ignore_patterns=["*.safetensors"],local_dir=local_dir)
3.1.1、cpp 版模型编译步骤
- 先进入终端中,进入到克隆到本地的 chatglm.cpp 文件夹内,执行以下命令
- 转换文件类型
由于 chatglm3-6b 的文件太多,我本来想只下载 bin 文件来进行转换的,结果提示找不到 .safetensors 文件,所不不得不全部下载
# 划线的部分是 chatglm3-6b 文件夹的路径,更换成自己的
python3 chatglm_cpp/convert.py -i Desktop/Project_practice/LongChain/chatglm3-6b-cpp/models/chatglm3-6b -t q4_0 -o chatglm3-ggml.bin
- 编译模型文件
# 正常编译:
# --config Release 表示使用指定的Release配置;-j
cmake -B build   # 创建一个名为“build”的文件夹,并为项目初始化它。
cmake --build build -j --config Release
# --build 标志指定构建目录的路径,
# -j 标志指定可以同时运行的任务数量,如果没有数量,将使用可用的处理器核心数来运行作业
# --config Release 标志指定构建类型为发布模式

# 开启苹果芯片加速编译:-DGGML_METAL=ON (Mac 推荐)
cmake -B build -DGGML_METAL=ON && cmake --build build -j --config Release

# 开启 CPU 加速编译:-DGGML_OPENBLAS=ON
cmake -B build -DGGML_OPENBLAS=ON && cmake --build build -j
- 聊天测试
# 单次查询
./build/bin/main -m chatglm3-ggml.bin -p 你好 --top_p 0.8 --temp 0.8
# temp(temperature):控制模型结果的随机性
# top_p核采样:控制模型考虑的概率范围;动态设置tokens候选列表的大小。 将可能性之和不超过特定值的top tokens列入候选名单。
# Top_k:允许其他高分tokens有机会被选中。这种采样引入的随机性有助于在很多情况下生成的质量。top-k参数设置为3意味着选择前三个tokens。将如果 k 和 p 都启用,则 p 在 k 之后起作用。

# 交互模式(输入 stop 退出交互;或者 control+C 退出交互)
./build/bin/main -m chatglm3-ggml.bin -i

# 设置系统提示词,-p 单次启动
./build/bin/main -m chatglm3-ggml.bin -p 你好 -s "You are ChatGLM3, a large language model trained by Zhipu.AI. Follow the user's instructions carefully. Respond using markdown."

# 函数调用
./build/bin/main -m chatglm3-ggml.bin --top_p 0.8 --temp 0.8 --sp examples/system/function_call.txt -i

# 代码解释器
./build/bin/main -m chatglm3-ggml.bin --top_p 0.8 --temp 0.8 --sp examples/system/code_interpreter.txt -i
3.1.2、python 绑定
- 同样 先进入 chatglm.cpp 文件夹内,执行以下命令
- 安装依赖包
CMAKE_ARGS="-DGGML_METAL=ON" pip install -U chatglm-cpp
- 使用转译后的 ggml 模型
# To chat in stream(不是很理解有什么特殊的用途)
python3 examples/cli_demo.py -m chatglm3-ggml.bin -i

# Launch a web demo to chat in your browser(创建web demo)
python3 examples/web_demo.py -m chatglm3-ggml.bin
# 第一遍提示少了包 gradio(pip 安装即可)

# 新版本的 web 界面?
streamlit run examples/chatglm3_demo.py
3.1.3、API服务
- 安装依赖包
CMAKE_ARGS="-DGGML_METAL=ON" pip install 'chatglm-cpp[api]'
- 启动服务
官方给出的指令会报错:
ModuleNotFoundError: No module named 'chatglm_cpp._C',具体查看这个帖子MODEL=./chatglm3-ggml.bin uvicorn chatglm_cpp.langchain_api:app --host 127.0.0.1 --port 8000
根据帖子指示,改进如下:
# 原本是在chatglm.cpp文件夹中
cd chatglm_cpp   # 不进入文件夹会报错Error loading ASGI app. Could not import module "openai_api".
MODEL=../chatglm3-ggml.bin uvicorn langchain_api:app --host 127.0.0.1 --port 8000   # 启动 chatglm API
MODEL=../chatglm3-ggml.bin uvicorn openai_api:app --host 127.0.0.1 --port 8000   # 启动兼容 openai 的 API
服务启动之后新开一个终端窗口,并进入虚拟环境,测试 api 接口
# 测试chatglm API
curl http://127.0.0.1:8000 -H 'Content-Type: application/json' -d '{"prompt": "你好"}'
# 测试兼容 openai 的 API
curl http://127.0.0.1:8000/v1/chat/completions -H 'Content-Type: application/json' -d '{"messages": [{"role": "user", "content": "你好"}]}'
- 在代码中引入api 接口
from langchain.llms import ChatGLM

llm = ChatGLM(endpoint_url="http://127.0.0.1:8000")
llm.predict("你好")

# '你好👋!我是人工智能助手 ChatGLM2-6B,很高兴见到你,欢迎问我任何问题。'
from openai import OpenAI

client = OpenAI(base_url="http://127.0.0.1:8000/v1")
response = client.chat.completions.create(model="default-model", messages=[{"role": "user", "content": "你好"}])
response.choices[0].message.content

# '你好👋!我是人工智能助手 ChatGLM3-6B,很高兴见到你,欢迎问我任何问题。'
也支持流响应,详情查看原仓库教程
3.2、LangChain 搭建 LLM应用
参考llama的构建过程
四、Ollama(大模型管理平台)
Ollama是一个管理器,可以下载、管理、启动一些常见的开源大模型(应该也是量化版),但是目前还不支持 ChatGLM,在下载和启动 Ollama 之后,可以在这里查看怎么在 LangChain 中运用,以及在这里查看 Ollama API 其他使用方法。Ollama 的下载和安装都比上面提到的两个简单,对新手友好。Ollama 下载 app 并安装之后就默认启动了 API 服务,不需要使用
ollama serve命令重复开启(会提示端口被占用)。ollama
ollama • Updated Nov 16, 2025
ollama pull llama2                     # 拉取一个模型(可以用来更新模型)
ollama run llama2                      # 运行一个模型,如果模型不存在就会自动下载
ollama rm llama2                       # 删除模型
ollama cp llama2 my-llama2             # 复制模型
ollama list                            # 模型清单
ollama serve                           # 开启服务

# 从本地 gguf 文件中创建运行
mkdir Modelfile                        # 新建一个文件夹
FROM ./vicuna-33b.Q4_0.gguf            # 指定gguf镜像文件路径(这里的 FROM 是 Docker 的命令)
ollama create mymodel -f ./Modelfile   # 从路径中创建实例
ollama run llama3                      # 运行实例

# 多行输入,使用三引号
>>> """Hello,
... world!
... """

# 多模态输入,指定文件路径
>>> What's in this image? /Users/jmorgan/Desktop/smile.png

# 将提示作为参数
ollama run llama2 "Summarize this file: $(cat README.md)"

/bye   # 退出聊天
Ollama API 使用
API 端口:http://127.0.0.1:11434
completion 接口
接口路由:
http://127.0.0.1:11434/api/generate接口参数:
model : (必需)模型名称
prompt :生成响应的提示
suffix :模型响应之后的文本
images :(可选)一组 base64 编码的图片(用于多模态模型如 llava )

format :返回响应的格式。格式可以是 json 或 JSON 模式
options : 在 Modelfile 文档中列出的附加模型参数,例如 temperature
system :系统消息到(覆盖了在 Modelfile 中定义的内容)
template : 要使用的提示模板(覆盖 Modelfile 中定义的内容)
stream : 如果 false ,则响应将作为单个响应对象返回,而不是对象流
raw : 如果 true 没有格式化,则不会对提示符应用格式。您可以选择在请求 API 时使用 raw 参数,如果您指定了一个完整的模板提示符
keep_alive :控制模型在请求后将在内存中保持多长时间(默认: 5m )
context (已弃用):从先前的请求返回到 /generate 的上下文参数,这可以用来保持短暂的对话记忆
接口示例
curl http://localhost:11434/api/generate -d '{
  "model": "llama3.2",
  "prompt": "Why is the sky blue?"
}'


curl http://localhost:11434/api/generate -d '{
  "model": "llama3.2",
  "prompt": "Why is the sky blue?",
  "stream": false
}'


curl http://localhost:11434/api/generate -d '{
  "model": "llama3.2",
  "prompt": "What color is the sky at different times of the day? Respond using JSON",
  "format": "json",
  "stream": false
}'


curl http://localhost:11434/api/generate -d '{
  "model": "llava",
  "prompt":"What is in this picture?",
  "stream": false,
  "images": ["iVBORw0KGgoAAAANSUhEUgAAAG0AAABmCAYAAADBPx+VAAAACXBIWXMAAAsTAAALEwEAmpwYAAAAAXNSR0IArs4c6QAAAARnQU1BAACxjwv8YQUAAA3VSURBVHgB7Z27r0zdG8fX743i1bi1ikMoFMQloXRpKFFIqI7LH4BEQ+NWIkjQuSWCRIEoULk0gsK1kCBI0IhrQVT7tz/7zZo888yz1r7MnDl7z5xvsjkzs2fP3uu71nNfa7lkAsm7d++Sffv2JbNmzUqcc8m0adOSzZs3Z+/XES4ZckAWJEGWPiCxjsQNLWmQsWjRIpMseaxcuTKpG/7HP27I8P79e7dq1ars/yL4/v27S0ejqwv+cUOGEGGpKHR37tzJCEpHV9tnT58+dXXCJDdECBE2Ojrqjh071hpNECjx4cMHVycM1Uhbv359B2F79+51586daxN/+pyRkRFXKyRDAqxEp4yMlDDzXG1NPnnyJKkThoK0VFd1ELZu3TrzXKxKfW7dMBQ6bcuWLW2v0VlHjx41z717927ba22U9APcw7Nnz1oGEPeL3m3p2mTAYYnFmMOMXybPPXv2bNIPpFZr1NHn4HMw0KRBjg9NuRw95s8PEcz/6DZELQd/09C9QGq5RsmSRybqkwHGjh07OsJSsYYm3ijPpyHzoiacg35MLdDSIS/O1yM778jOTwYUkKNHWUzUWaOsylE00MyI0fcnOwIdjvtNdW/HZwNLGg+sR1kMepSNJXmIwxBZiG8tDTpEZzKg0GItNsosY8USkxDhD0Rinuiko2gfL/RbiD2LZAjU9zKQJj8RDR0vJBR1/Phx9+PHj9Z7REF4nTZkxzX4LCXHrV271qXkBAPGfP/atWvu/PnzHe4C97F48eIsRLZ9+3a3f/9+87dwP1JxaF7/3r17ba+5l4EcaVo0lj3SBq5kGTJSQmLWMjgYNei2GPT1MuMqGTDEFHzeQSP2wi/jGnkmPJ/nhccs44jvDAxpVcxnq0F6eT8h4ni/iIWpR5lPyA6ETkNXoSukvpJAD3AsXLiwpZs49+fPn5ke4j10TqYvegSfn0OnafC+Tv9ooA/JPkgQysqQNBzagXY55nO/oa1F7qvIPWkRL12WRpMWUvpVDYmxAPehxWSe8ZEXL20sadYIozfmNch4QJPAfeJgW3rNsnzphBKNJM2KKODo1rVOMRYik5ETy3ix4qWNI81qAAirizgMIc+yhTytx0JWZuNI03qsrgWlGtwjoS9XwgUhWGyhUaRZZQNNIEwCiXD16tXcAHUs79co0vSD8rrJCIW98pzvxpAWyyo3HYwqS0+H0BjStClcZJT5coMm6D2LOF8TolGJtK9fvyZpyiC5ePFi9nc/oJU4eiEP0jVoAnHa9wyJycITMP78+eMeP37sXrx44d6+fdt6f82aNdkx1pg9e3Zb5W+RSRE+n+VjksQWifvVaTKFhn5O8my63K8Qabdv33b379/PiAP//vuvW7BggZszZ072/+TJk91YgkafPn166zXB1rQHFvouAWHq9z3SEevSUerqCn2/dDCeta2jxYbr69evk4MHDyY7d+7MjhMnTiTPnz9Pfv/+nfQT2ggpO2dMF8cghuoM7Ygj5iWCqRlGFml0QC/ftGmTmzt3rmsaKDsgBSPh0/8yPeLLBihLkOKJc0jp8H8vUzcxIA1k6QJ/c78tWEyj5P3o4u9+jywNPdJi5rAH9x0KHcl4Hg570eQp3+vHXGyrmEeigzQsQsjavXt38ujRo44LQuDDhw+TW7duRS1HGgMxhNXHgflaNTOsHyKvHK5Ijo2jbFjJBQK9YwFd6RVMzfgRBmEfP37suBBm/p49e1qjEP2mwTViNRo0VJWH1deMXcNK08uUjVUu7s/zRaL+oLNxz1bpANco4npUgX4G2eFbpDFyQoQxojBCpEGSytmOH8qrH5Q9vuzD6ofQylkCUmh8DBAr+q8JCyVNtWQIidKQE9wNtLSQnS4jDSsxNHogzFuQBw4cyM61UKVsjfr3ooBkPSqqQHesUPWVtzi9/vQi1T+rJj7WiTz4Pt/l3LxUkr5P2VYZaZ4URpsE+st/dujQoaBBYokbrz/8TJNQYLSonrPS9kUaSkPeZyj1AWSj+d+VBoy1pIWVNed8P0Ll/ee5HdGRhrHhR5GGN0r4LGZBaj8oFDJitBTJzIZgFcmU0Y8ytWMZMzJOaXUSrUs5RxKnrxmbb5YXO9VGUhtpXldhEUogFr3IzIsvlpmdosVcGVGXFWp2oU9kLFL3dEkSz6NHEY1sjSRdIuDFWEhd8KxFqsRi1uM/nz9/zpxnwlESONdg6dKlbsaMGS4EHFHtjFIDHwKOo46l4TxSuxgDzi+rE2jg+BaFruOX4HXa0Nnf1lwAPufZeF8/r6zD97WK2qFnGjBxTw5qNGPxT+5T/r7/7RawFC3j4vTp09koCxkeHjqbHJqArmH5UrFKKksnxrK7FuRIs8STfBZv+luugXZ2pR/pP9Ois4z+TiMzUUkUjD0iEi1fzX8GmXyuxUBRcaUfykV0YZnlJGKQpOiGB76x5GeWkWWJc3mOrK6S7xdND+W5N6XyaRgtWJFe13GkaZnKOsYqGdOVVVbGupsyA/l7emTLHi7vwTdirNEt0qxnzAvBFcnQF16xh/TMpUuXHDowhlA9vQVraQhkudRdzOnK+04ZSP3DUhVSP61YsaLtd/ks7ZgtPcXqPqEafHkdqa84X6aCeL7YWlv6edGFHb+ZFICPlljHhg0bKuk0CSvVznWsotRu433alNdFrqG45ejoaPCaUkWERpLXjzFL2Rpllp7PJU2a/v7Ab8N05/9t27Z16KUqoFGsxnI9EosS2niSYg9SpU6B4JgTrvVW1flt1sT+0ADIJU2maXzcUTraGCRaL1Wp9rUMk16PMom8QhruxzvZIegJjFU7LLCePfS8uaQdPny4jTTL0dbee5mYokQsXTIWNY46kuMbnt8Kmec+LGWtOVIl9cT1rCB0V8WqkjAsRwta93TbwNYoGKsUSChN44lgBNCoHLHzquYKrU6qZ8lolCIN0Rh6cP0Q3U6I6IXILYOQI513hJaSKAorFpuHXJNfVlpRtmYBk1Su1obZr5dnKAO+L10Hrj3WZW+E3qh6IszE37F6EB+68mGpvKm4eb9bFrlzrok7fvr0Kfv727dvWRmdVTJHw0qiiCUSZ6wCK+7XL/AcsgNyL74DQQ730sv78Su7+t/A36MdY0sW5o40ahslXr58aZ5HtZB8GH64m9EmMZ7FpYw4T6QnrZfgenrhFxaSiSGXtPnz57e9TkNZLvTjeqhr734CNtrK41L40sUQckmj1lGKQ0rC37x544r8eNXRpnVE3ZZY7zXo8NomiO0ZUCj2uHz58rbXoZ6gc0uA+F6ZeKS/jhRDUq8MKrTho9fEkihMmhxtBI1DxKFY9XLpVcSkfoi8JGnToZO5sU5aiDQIW716ddt7ZLYtMQlhECdBGXZZMWldY5BHm5xgAroWj4C0hbYkSc/jBmggIrXJWlZM6pSETsEPGqZOndr2uuuR5rF169a2HoHPdurUKZM4CO1WTPqaDaAd+GFGKdIQkxAn9RuEWcTRyN2KSUgiSgF5aWzPTeA/lN5rZubMmR2bE4SIC4nJoltgAV/dVefZm72AtctUCJU2CMJ327hxY9t7EHbkyJFseq+EJSY16RPo3Dkq1kkr7+q0bNmyDuLQcZBEPYmHVdOBiJyIlrRDq41YPWfXOxUysi5fvtyaj+2BpcnsUV/oSoEMOk2CQGlr4ckhBwaetBhjCwH0ZHtJROPJkyc7UjcYLDjmrH7ADTEBXFfOYmB0k9oYBOjJ8b4aOYSe7QkKcYhFlq3QYLQhSidNmtS2RATwy8YOM3EQJsUjKiaWZ+vZToUQgzhkHXudb/PW5YMHD9yZM2faPsMwoc7RciYJXbGuBqJ1UIGKKLv915jsvgtJxCZDubdXr165mzdvtr1Hz5LONA8jrUwKPqsmVesKa49S3Q4WxmRPUEYdTjgiUcfUwLx589ySJUva3oMkP6IYddq6HMS4o55xBJBUeRjzfa4Zdeg56QZ43LhxoyPo7Lf1kNt7oO8wWAbNwaYjIv5lhyS7kRf96dvm5Jah8vfvX3flyhX35cuX6HfzFHOToS1H4BenCaHvO8pr8iDuwoUL7tevX+b5ZdbBair0xkFIlFDlW4ZknEClsp/TzXyAKVOmmHWFVSbDNw1l1+4f90U6IY/q4V27dpnE9bJ+v87QEydjqx/UamVVPRG+mwkNTYN+9tjkwzEx+atCm/X9WvWtDtAb68Wy9LXa1UmvCDDIpPkyOQ5ZwSzJ4jMrvFcr0rSjOUh+GcT4LSg5ugkW1Io0/SCDQBojh0hPlaJdah+tkVYrnTZowP8iq1F1TgMBBauufyB33x1v+NWFYmT5KmppgHC+NkAgbmRkpD3yn9QIseXymoTQFGQmIOKTxiZIWpvAatenVqRVXf2nTrAWMsPnKrMZHz6bJq5jvce6QK8J1cQNgKxlJapMPdZSR64/UivS9NztpkVEdKcrs5alhhWP9NeqlfWopzhZScI6QxseegZRGeg5a8C3Re1Mfl1ScP36ddcUaMuv24iOJtz7sbUjTS4qBvKmstYJoUauiuD3k5qhyr7QdUHMeCgLa1Ear9NquemdXgmum4fvJ6w1lqsuDhNrg1qSpleJK7K3TF0Q2jSd94uSZ60kK1e3qyVpQK6PVWXp2/FC3mp6jBhKKOiY2h3gtUV64TWM6wDETRPLDfSakXmH3w8g9Jlug8ZtTt4kVF0kLUYYmCCtD/DrQ5YhMGbA9L3ucdjh0y8kOHW5gU/VEEmJTcL4Pz/f7mgoAbYkAAAAAElFTkSuQmCC"]
}'


curl http://localhost:11434/api/generate -d '{
  "model": "mistral",
  "prompt": "Why is the sky blue?",
  "options": {
    "seed": 123
  }
}'


curl http://localhost:11434/api/generate -d '{
  "model": "llama3.2",
  "prompt": "Why is the sky blue?",
  "stream": false,
  "options": {
    "num_keep": 5,
    "seed": 42,
    "num_predict": 100,
    "top_k": 20,
    "top_p": 0.9,
    "min_p": 0.0,
    "typical_p": 0.7,
    "repeat_last_n": 33,
    "temperature": 0.8,
    "repeat_penalty": 1.2,
    "presence_penalty": 1.5,
    "frequency_penalty": 1.0,
    "mirostat": 1,
    "mirostat_tau": 0.8,
    "mirostat_eta": 0.6,
    "penalize_newline": true,
    "stop": ["\n", "user:"],
    "numa": false,
    "num_ctx": 1024,
    "num_batch": 2,
    "num_gpu": 1,
    "main_gpu": 0,
    "low_vram": false,
    "vocab_only": false,
    "use_mmap": true,
    "use_mlock": false,
    "num_thread": 8
  }
}'


curl http://localhost:11434/api/generate -d '{
  "model": "codellama:code",
  "prompt": "def compute_gcd(a, b):",
  "suffix": "    return result",
  "options": {
    "temperature": 0
  },
  "stream": false
}'


curl -X POST http://localhost:11434/api/generate -H "Content-Type: application/json" -d '{
  "model": "llama3.1:8b",
  "prompt": "Ollama is 22 years old and is busy saving the world. Respond using JSON",
  "stream": false,
  "format": {
    "type": "object",
    "properties": {
      "age": {
        "type": "integer"
      },
      "available": {
        "type": "boolean"
      }
    },
    "required": [
      "age",
      "available"
    ]
  }
}'
chat 接口
接口路由:
http://127.0.0.1:11434/api/chat接口参数:
model : (必需)模型名称
messages : 聊天消息,这可以用来保存聊天记录
	role: 消息的角色,要么是 system , user , assistant ,要么是 tool
	content :消息内容
	images (可选):要包含在消息中的图像列表(用于多模态模型如 llava )
	tool_calls (可选):模型想要使用的工具列表
tools : 如果支持,模型将使用的工具。需要将 stream 设置为 false

高级参数(可选):
format :返回响应的格式。格式可以是 json 或 JSON 模式。
options : 在 Modelfile 文档中列出的附加模型参数,例如 temperature
stream : 如果 false ,则响应将作为单个响应对象返回,而不是对象流
keep_alive :控制模型在请求后将在内存中保持多长时间(默认: 5m )
接口示例
curl http://localhost:11434/api/chat -d '{
  "model": "llama3.2",
  "messages": [
    {
      "role": "user",
      "content": "why is the sky blue?"
    }
  ]
}'


curl http://localhost:11434/api/chat -d '{
  "model": "llama3.2",
  "messages": [
    {
      "role": "user",
      "content": "why is the sky blue?"
    }
  ],
  "stream": false
}'


curl http://localhost:11434/api/chat -d '{
  "model": "llama3.2",
  "messages": [
    {
      "role": "user",
      "content": "why is the sky blue?"
    },
    {
      "role": "assistant",
      "content": "due to rayleigh scattering."
    },
    {
      "role": "user",
      "content": "how is that different than mie scattering?"
    }
  ]
}'


curl -X POST http://localhost:11434/api/chat -H "Content-Type: application/json" -d '{
  "model": "llama3.1",
  "messages": [{"role": "user", "content": "Ollama is 22 years old and busy saving the world. Return a JSON object with the age and availability."}],
  "stream": false,
  "format": {
    "type": "object",
    "properties": {
      "age": {
        "type": "integer"
      },
      "available": {
        "type": "boolean"
      }
    },
    "required": [
      "age",
      "available"
    ]
  },
  "options": {
    "temperature": 0
  }
}'


curl http://localhost:11434/api/chat -d '{
  "model": "llama3.2",
  "messages": [
    {
      "role": "user",
      "content": "What is the weather today in Paris?"
    }
  ],
  "stream": false,
  "tools": [
    {
      "type": "function",
      "function": {
        "name": "get_current_weather",
        "description": "Get the current weather for a location",
        "parameters": {
          "type": "object",
          "properties": {
            "location": {
              "type": "string",
              "description": "The location to get the weather for, e.g. San Francisco, CA"
            },
            "format": {
              "type": "string",
              "description": "The format to return the weather in, e.g. 'celsius' or 'fahrenheit'",
              "enum": ["celsius", "fahrenheit"]
            }
          },
          "required": ["location", "format"]
        }
      }
    }
  ]
}'
其他接口
- 可用模型列表:
curl http://localhost:11434/api/tags
- 运行模型列表:
curl http://localhost:11434/api/ps
- 模型详细信息:
curl http://localhost:11434/api/show -d '{"model": "llama3.2"}'
- 复制模型:
curl http://localhost:11434/api/copy -d '{"source": "llama3.2","destination": "llama3-backup"}'
- 删除模型:
curl -X DELETE http://localhost:11434/api/delete -d '{"model": "llama3:13b"}'
- 拉取模型:
curl http://localhost:11434/api/pull -d '{"model": "llama3.2"}'
- 推送模型:
curl http://localhost:11434/api/push -d '{"model": "mattw/pygmalion:latest"}'
- 生成嵌入:
curl http://localhost:11434/api/embed -d '{"model": "all-minilm","input": "Why is the sky blue?"}'
- ollama 版本:
GET /api/version